System settings
System settings are default settings that are configured for your organization, such as default settings for work orders, PM schedules, and SAML. A Global Administrator can edit these settings if required. If you have specific settings that are configured for a Site, then the site settings take precedence over the default system settings. *Note: The feature below is only available to clients who have purchased Asset Essentials Enterprise. Please contact your Sales Representative or Client Services if you are interested in purchasing Asset Essentials Enterprise.
- Click on the Admin menu icon, then select Configurations.
- In the Misc section, select System Settings.
- Click the Edit button. This will open the Configurations page.
- Click Save at the top of the screen to save any changes.
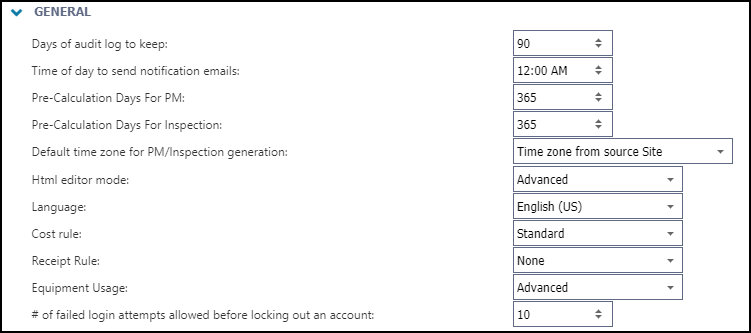
General
The General section includes the settings that you have configured for your organization. A Global Administrator can edit these settings if needed.
-
The Days of audit log to keep field defaults to 90 days, which tracks all the actions taken on the account for a period of 90 days. You can edit the number of days that you want to retain audit logs. After the end of this period, the records are deleted from Asset Essentials.
-
The Time of day to send notification emails field allows you to configure the time that you want to send notification emails to users. This is useful to track the status on a work order.
-
The Pre-Calculation Days For PM field defaults to 365, which allows Asset Essentials to forecast and generate a PM schedule for the specified days. You can edit the number of days, if required.
-
The Pre-Calculation Days For Inspection field defaults to 365, which allows Asset Essentials to forecast and generate an inspection schedule for the specified days. You can edit the number of days, if required.
-
The Default time zone for PM/Inspection generation setting allows you to select the default time zone that should apply to PM and inspection schedules. The time zone selected appears in the Next Scheduled date column in the PM/PdM list. From the drop-down, select one of the following options:
-
Time zone from source site:Display the default time zone configured for the site.
-
Time zone from assigned to: Display the user's time zone. This is typically used if the user's time zone is different from the default time zone configured for the site.
-
Specified time zone: Display the time zone that is specified in the System Settings. Select the applicable UTC time zone.
-
-
The Html editor mode setting allows you to select the default Html editor mode that should apply to all text boxes that appear in Asset Essentials. From the drop-down, select one of the following options:
-
Spell check only: By default, this option applies to all text boxes. This performs a basic spell check of the text that is included in the text box and has no formatting options.
-
Basic: Text boxes should include an editing tool bar. This provides the user with some basic editing options such as bold, underline, full screen mode, and insert link.
-
Advanced: Text boxes should include an advanced editing tool bar. This provides the user with advanced formatting options such as font, text size, alignment, and indentation options.
-
-
From the Language drop-down, select the language that should apply to all labels within Asset Essentials.
-
The Cost Rule setting indicates how you want to update the cost for the part, applies only when using the Purchase Orders feature. From the drop-down, select one of the following options:
-
Standard: Part line-item costs are derived from the part record unit cost.
-
Average: Asset Essentials will update the current part record unit cost based on the average cost of new purchases.
-
-
The Receipt Rule setting indicates how the application will distribute the landed cost for each inventory line item on Purchase Order.. From the drop-down, select one of the following options:
-
None: Do not apply a receipt rule.
-
Standard: Distributes the total tax and shipping cost on a Purchase Order to the unit cost based on quantity.
-
-
The Equipment Usage setting allows you to select the options that should display in the Equipment Usage section of the work order. From the drop-down, select one of the following options:
- Basic: Allow users to add only equipment usage to the work order. This displays the Add Transaction button in the Equipment Usage section of the work order.
Advanced:Allow users to add equipment usage, checkout, and return equipment from the work order. This displays the Add Transaction, Check-out Equipment, and Return buttons in the Equipment Usage section of the work order.
- Basic: Allow users to add only equipment usage to the work order. This displays the Add Transaction button in the Equipment Usage section of the work order.
-
In the # of failed login attempts allowed before locking out an account field, enter the number of failed sign-in attempts a user is allowed before the account is locked out. After the threshold has been reached, the account will be locked out. This value cannot be lower than 3.
-
The Part Reorder Point Calculation setting allows you to choose how the system determines when a part needs to be reordered. Select one of the following options:
- Below or equal to reorder point (industry standard): Trigger a reorder notification when the on hand quantity of a part is equal to or below the set reorder point. *Note: This is the default setting and is the industry standard for reorder notifications.
- Include in calculation if Reorder Point = 0: If this box is checked, parts with 0 on hand quantity will be displayed on the dashboard for reorder. If it is left unchecked, parts with a quantity of 0 will not be flagged for reorder.
- Below reorder point (legacy implementation): Trigger a reorder notification only when the on hand quantity of a part falls below the set reorder point.
- To receive these notifications, the user must have the when there are parts that need to be reordered box checked under the My Profile page, Email me section.
- Below or equal to reorder point (industry standard): Trigger a reorder notification when the on hand quantity of a part is equal to or below the set reorder point. *Note: This is the default setting and is the industry standard for reorder notifications.
- Below or equal to Min Value (Industry Standard) - This setting will trigger a reorder notification when the on hand quantity of a part is equal to or below the set min value. *Note: This is the default setting and is the industry standard for reorder notifications.
- Include in calculation if Min Level = 0 - If this box is checked, parts with 0 on hand quantity will be displayed on the dashboard for reorder. If it is left unchecked, parts with a quantity of 0 will not be flagged for reorder.
- Below Min Value (Legacy Implementation) - This setting will trigger a reorder notification only when the on hand quantity of a part falls below the set min value. *Note: This is how the feature behaved prior to the part Min/Max method enhancement.
- To receive these notifications, the user must have the when there are parts that need to be reordered box checked under the My Profile page, Email me section.
- The Part Negative Quantity Control setting allows you to choose if a part's quantity is able to drop below zero. You can apply this setting globally under the Admin Configurations or you can apply this setting to each individual site separately. Select one of the following options:
- Yes: Any Part transaction that would lead to a negative Part quantity will be prohibited.
- No: Any Part transaction that would lead to a negative Part quantity will be allowed.

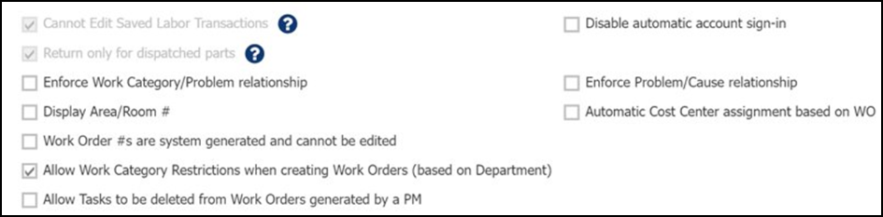
- Select the Cannot Edit Saved Labor Transactions box to prevent labor transactions from being edited once they are entered. With this setting enabled, adjustments to any labor transaction will need to be made by creating additional labor transactions. Work order transactions will become read-only the moment they are saved.
- Select the Return only for dispatched parts box to ensure that a separate transaction is made when returning parts that were not needed for the work order. This will prevent part transactions on a work order from being edited or deleted.
- Select the Disable automatic account sign-in box to ensure that users enter their credentials every time they need to log into Asset Essentials. This disables automatic log into the system and prevents cookies from being saved from the previous log in session.
- Select the Enforce Work Category/Problem relationship box to enforce that only specific problem codes can be related to the work category selected on the work order form.
- Select the Enforce Problem/Cause relationship box to enforce that only specific cause codes can be related to the problem code selected on the work order form.
- Select the Display Area/Room # box, to display the Area/Room # field in Request Templates.
- Select the Automatic Cost Center assignment based on WO box to automatically apply the cost center that is assigned to the asset in the work order form.
- Select the Work Order #s are system generated and cannot be edited box to prevent users from creating their own work order numbers when submitting a new work order or editing an existing work order. Once this setting is enabled, the Work Order # field on a work order form will be locked down and cannot be edited.
- Select the Allow Work Category Restrictions when creating Work Orders (based on Department) box to restrict the work category list in the work order form to display only the work categories that apply to the user's department.
- The Allow Tasks to be deleted from Work Orders generated by a PM option is checked by default. To remove the ability for tasks to be deleted from PM work orders, uncheck the box.
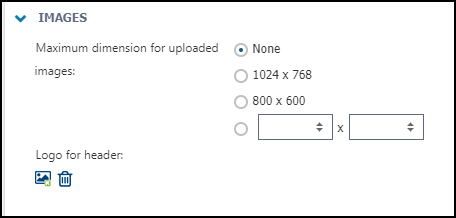
Images
-
The Maximum dimension for uploaded images setting allows you to choose the dimensions of the images that a user can upload on the work order form. Choose one of the following options:
-
None: Does not resize the uploaded image.
-
1024 x 768: The maximum dimensions allowed are 1024 x 768 pixels.
-
800 x 600: The maximum dimensions allowed are 800 x 600 pixels.
-
Custom: Allows you to enter a custom image size. In the boxes, enter the width and height you want as the image size. For example, 500 x 500.
-
-
The Logo for header setting allows you to select a logo that should display on the header at the top of each page. The image file must be either a jpeg or gif file. All logos are automatically resized to 200 x 48 pixels.
Requester Registration
This section allows you to enable self-registration for requesters. This allows a requester to create an account from the organization's sign-in page.
-
Select the default Region that the requester should be assigned to upon registration.
-
Select the default Site that the requester should be assigned to upon registration.
-
Select the Allow a requester to change region/site box if you want to allow the requester to change the region and site applicable to the work order.
-
From the User Status drop-down, select the status that defines the requester's working hours.
-
Select the Role that should apply by default to requester accounts. Select one of the following:
-
Requester: Requesters can submit and view work requests. When they log in to Asset Essentials, they see the request form.
-
Power Requester: Power Requesters can submit work requests for their assigned site(s). They are able to view their own work requests and other user's work requests for their assigned site(s). When they log in to Asset Essentials, they see the request form.
-
![]()
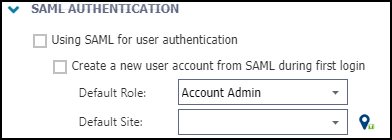
SAML Authentication
This section allows you to enable SAML (Security Assertion Markup Language) to authenticate users.
-
Select the Using SAML for user authentication box to allow users to authenticate into Asset Essentials using SAML.
-
Select the Create a new user account from SAML during first login box to create a new user account from the SAML attributes that the user used to login.
-
Select the default Role that SAML authenticated users will have once authenticated (signed in).
-
Select the default Site that SAML authenticated users will be assigned to once authenticated (signed in). This is a required field if you are using SAML.